Tuesday, 27 October 2020

CoTGB: The Anchorhead War (First Battle)


Mark Stevens from Mos Pattaya has run a series of battles in a linked campaign, using Challengers of the Great Beyond. The figures used are mostly from the now defunct Wizards of the Coast Star Wars range, but there are a lot from other manufacturers mixed in. I'll now leave it to Marks battle report...

The so called Anchorhead War is not widely known beyond the arid Outer-Rim world of Tataouine. It got its name from what could be seen in retrospect as the first skirmish in the conflict, when indigenous primitives (Sand People) attacked the small moisture farming settlement of Anchorhead on the edge of the Dune Sea.

The two sides each comprised the statutory 16 slots:

Sand People: life points 7
1 x Maverick character - Stilgar (Leader) (3)
1 x Beast rider character (Sand People warrior on giant lizard) (3)
1 x Marksman character (Sand People warrior with jezzail sniper rifle) (2)
4 x Proud warrior squads (Sand People warriors, 6 pet squad) (8)

Anchorhead defenders: life points 7
1 x Psi-master character (Jedi master Kyle Katarn*) (Leader) (5)
1 x Sentry gun character (Community defence weapon) (3)
4 x Cadets squads (Assorted armed inhabitants, 6 per squad) (8)
* “Honestly guv, I was just passing through”

Here’s the (900x900mm) tabletop, featuring the little settlement and surrounding buttes and patches of thorn scrub & rocks, all impenetrable. The two forces are lined up facing each other off-table at R, attackers nearer the camera.

This is a "modified" ambush scenario. The Sand People will attack from the South (bottom of photo). The defenders will start with their character models (Jedi Master, Sentry gun) and one squad on table. The other squads are assumed to be coming from surrounding settlements and will arrive from the North on the first turn after turn 2 when the defender side does not win initiative.

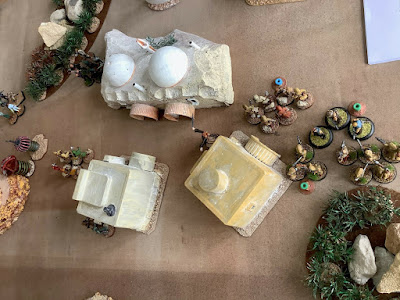
After 2 turns the Sand People seem to be overrunning Anchorhead. At top R the explosion marker shows where one warrior squad has charged the sentry gun. It failed to score any hits on them as they charged, or in the melee and they destroyed it (4 melee hits).

Near the sentry gun you can see Jedi Master “Leaping” Kyle Katarn. He was attacked by the warrior squad now in the Main Street. At lower L yet another Sand People squad survived an opportunity fire shot from the moisture farmers (2 hits) and dominated them in the melee (3 hits).


After 6 turns the Moisture Farmers are staging a bit of a comeback, but probably it won’t be enough. At top of shot 1 Sand People squad is being shot at by 2 Moisture Farmer squads, but so far each side has suffered only a single loss. But Kyle Katarn is having more success: he has used his psi powers to Mind Control the Sand People squad with the blue marker, and now he is moving them towards the big melee at bottom of shot.


In the big melee the Sand People now have 2 squads involved, one of which is on Condition Green. The Moisture Farmers have lost 1 whole squad, and have another squad on Green, but the Mind Controlled Sand People may be about to pile in! 

Elsewhere, the Sand People beast rider is still back on the start line from lack of Initiative Points. Stilgar (the Sand People leader) and the Marksman can be seen behind one of the houses. They were plotting an attack on Kyle Katarn but he has moved away.

Losses (life points) are: Sand People 1; Moisture Farmers 3.

The game ended at the end of turn 11, with a clear win to the Sand People. The photo shows the final position. At top of shot are 2 Moisture Farmer squads, one on Condition Green. They have destroyed a Sand People squad and Beast rider. To the L of them, another Sand People squad and the leader Stilgar (Maverick) have taken the Jedi Master Kyle Katarn to Condition Red. He chose to continue mind-controlling the enemy squad rather than (say) push the attacking squad away. The mind controlled squad is at bottom R of shot.


Both sides began with a life count (used for determining winning / losing) of 7, based on “more dead than alive” A life point is equal to 5 squad members or 1 (sometimes 2) character models. Kyle Katarn is a 2-point character.

At the end of the game the Sand People have lost their Beast Rider (1 life) and 13 squaddies (2 lives) so have 3 dead, 4 living. The Moisture Farmers have lost the Sentry Gun (1 life) and 15 squaddies (3 lives), and Kyle Katarn, being a character on condition red, isn’t dead but counts against the total life count of the force, so have 4 dead, 1 living.

In forthcoming instalments:

🚩 The Moisture Farmers hire mercenary help and go after the Sand People
🚩 The Imperial garrison gets involved
🚩 The Sand People step it up and attack Mos Pattaya (it’s the Tet offensive).

Cheers from Mos Pattaya (not on the front line yet)

Mark


Friday, 23 October 2020

CoTGB: Smugglers vs Warbots


It was time to play Challengers of the Great Beyond again at the Southern Battlegamers club. I planned to run a force of warbots against a rag-tag smuggler type grouping run by Martin. The warbot force was using the sample list in the book, being;

Cyborg leader (Primordial Beast): 4 slots
Sentry gun: 3 slots
Robot sidekick: 1 slot
4 x light warbots (Cadets): 8 slots 

Martins smuggler crew were;

Psi-Knight leader: 4 slots
Bounty Hunter: 3 slots
2 x Starport Thugs: 6 slots
1 x Proud warriors: 2 slots
1 x burden: 1 slot

This is an image of the warbot force. Due to the great secrecy the smugglers carry out their operations in, I did not get an image of their starting line up.

We rolled for the complication and got "the macguffin redux". This is a tricky scenario, probably better suited to a more stealthy force like the smugglers. Both players put a clue token on their half of the board, and whenever a unit moves over a token, it is removed. From the 4th token removed, there is a chance it will be the "final" token that has the artifact that must be taken off the table. The trick is in the timing of uncovering the tokens - if you reveal all the ones on your half of the board, you give the game to the opponent, as they will be guaranteed to find the artifact on their half of the board and easily win the game.

The initial set up is as follows;


The yellow discs are the clue tokens. Of interest was a group of starport thugs finding a cozy home at a franchise outlet of Morebucks Slurpdregs franchise;


Anyway, the smugglers won the first initiative and the psi-knight leader using the leap psi skill leapt across the table from his position at the side of the morebucks building straight into a group of light warbots. The warbots used opportunity fire, inflicting 1 hit on the psi-knight, however, the melee was a fizzer - the psi knight must have been distracted by the flesh wound and completely missed.

In the following turn the warbots won the initiative and the cyborg leader, with its great movement ability, charged into the psi knight, the position shown below;


The fight was again quite defensive, with the psi knight parrying all attacks while failing to inflict anything back. As a side action, other warbots fired upon their foes, but missed as the starports thugs are quite evasive. Even the sentry gun failed after unleashing a volley upon the morebucks building.

In the next turn, where the smugglers won the initiative, the psi-knight pulled off a telling move. Using the "speed" power, giving the opportunity for two actions, he broke off from the fight and revealed the first token on the warbots side of the board. With the second action, he charged into another group of light warbots with a view to entering the building behind them.

Below is the result of the fight;


The left image shows the initial attack and the roll of the psi knight - with 6's counting as double hits for a plasma sword wielder, that came to 7 hits, a total wipeout as seen on the right. The warbots did attack first with 4 dice, but being mooks against a martial artist, they scored no hits in return.

The warbots has a lot of work to do. They won initiative in the next turn and opened fire again on the morebucks building, where the thugs had climbed to the roof to get the next clue token. The gun scored 3 hits. The cyborg also charged the psi knight in an attempt to end his reign of destruction - with the fight again being a stalemate and no wounds on either side. The smugglers, losing initiative, did a lot of manouvering, with the proud warriors moveing to position to attack a group of light warbots, and the bounty hunter being revealed next to a clue token. The position shown below;


The next turn was critical to the outcome of the game. The smugglers won initiative, and were able to reveal the rest of the clue tokens on their half of the board. With the 4th token revealed, this was a big gamble. They had to roll a 5 or 6 to have the 4th token being the artefact, on a failure, the warbots get into the box seat for victory as the artefact will be on their half of the table. As it was, the bounty hunter, on revealing the 4th token, rolled a 5. There were only two things that could stop the smugglers winning - the group of nearby light warbots, and if the cyborg could win and be freed from the fight with the psi knight.

The proud warriors charged, losing one figure to opportunity fire, but rolled well in the fight, wiping out the warbots with 6 hits, amazing rolling, as can be seen by the picture. Again the fight between the cyborg and psi knight resulted in a stalemate. The cyborg, being a "primordial beast" could not break away from the fight, so the psi-knight just had to keep it pinned in melee.

In the following turn, the victory dance of the proud warriors was short lived, as a unit of light warbots opened fire and wiped out 4 figures, leaving only 1 remaining.

However, it was all to late as there was no one to stop the bounty hunter exiting the board and running off with the artefact. The game was over by the 6th turn with a victory to the smugglers. In terms of casualties, the smugglers lost 5 proud warriors and 3 starport thugs (8 squad figures), while the warbots lost 12 cadet figures.

The smugglers force worked to its strengths, the psi knight was able to take a clue from the opponents side of the board to get a chance at their end of the board, and the bounty hunter was able to appear at an opportune location to get the 4th clue. The main hitting unit of the warbots, the cyborg, was able to be kept engaged by the psi-knight while the smuggle force was free to reveal clues. Though, had they failed to succeed on the 4th clue, the game could have turned out quite differently. So a near run thing in the end, a good game!